Pages

Showing posts with label Painting. Show all posts

Tuesday, August 23, 2011

Table redo and paint technique

A couple of weeks ago I painted an ugly side table.
You may remember me telling you about it. If not you can go HERE for a quick recap.
I never did tell you what my technique was.
I had come across one of my old books called the Painted Kitchen that turned out to
be from the now  famous Annie Sloan.
In that book she of course used her chalk paint.
I never even paid any attention to it back when I first read the book.
I don’t think anyone was selling it in the states.
Turns out that she uses it as chalkboard paint too.
I knew how to make chalkboard paint so I thought I’d use it to paint furniture too.
6
Now since I’ve never used AS paint I can’t really do a fair comparison.
I do plan on getting some soon but for now it was
fun to try this method.
And I liked the results.
Ok now you want to know the details.
All you need is 2 tablespoons of sandless grout
to 1 cup of latex paint.
Mix well.
I did not sand the piece.
I think on this occasion it worked to my favor that it was rather beaten up on top but I did clean it with a damp cloth.
The paint dries fast…..from the sandless grout.
After a short drying time I waxed the surface with butchers wax. I’m sure you could try any wax with similar results.
Then I put on another coat of paint.
Then dry and sand.
Waxed again with straight wax first.
Then I added gel stain to the wax to add some depth.
You can also use tinted wax.
Dry and puffed out.
See EASY!
tablecloth

I painted the legs too but decided that I wanted to make a skirt for it.
A strip cloth skirt so I could still have the top exposed.
I used an old pillow case and attached the strips to a single piece of fabric.
Then used velcro to attach to the table.


skirt


I had some cool fabric I had picked up at the quilt store ( Coastal Sewing Machines)  that resembled
  tape measures and used a few strips for added interest.
(think I may need to add more)

under

Good for hiding things underneath the skirt.


lace


Just found this lace and yesterday and thought maybe I might add it to the edge.

on edge


hung


What do you think?
Is it too much?
Maybe I could make that detachable too.
When I was making my skirt my friend Suzan was making  strips for her
lamp too.

z's lamp

See more of Suzan’s makeover
Maybe I’ll use a small light under my table?
that would be fun.

top


Not sure what I’m going to decorate the table with. This was just thrown together.

orchid

The only thing I know I want is the orchid.
Every room needs a plant.
Even if it is a fake one.
Permanent botanical( sorry)
blue wedgewood

My dear friend Annie gave me this. It’s wedgewood…
but I’m sure you didn’t need me to tell you that.
It’s delicate and regal.
I may not be using it in the room but for now it makes me think of her.
So for now it will stay.
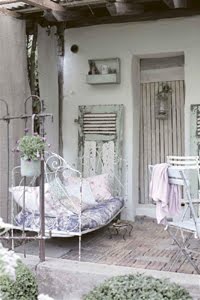
I hadn’t planned on using blue in this room this time around but when I do
I want to use this photo as my inspiration for the bedding.
untitled barn house
Found it on the latest post of Barn House

Click on photo and go to the Barn House blog to see more.
Those guys are incredibly talented.


Linking up to White Wednesday

Have a good week!

Tuesday, August 9, 2011

Giveaway at Z’s


Do you know my friend Z?
Actually Suzan ( with a Z) of Old Grey Mare
old grey mare

Well not only are you in for a treat when you see her humungo giveaway
but you will fall in love her and her blog.
We met around 2 yrs ago when we were doing White Wednesday.
Back in the day when there was no linky.
Remember that?…ok not all that long ago.
I knew from a few emails back and forth that this was someone special.
Ok I could write a whole post about how I feel about her but I’ll stop gushing because I
really want you to go to her blog and win some of these lovely gifts that these very talented and generous
gals have offered up for grabs.
My contribution is a Jeanne d’Arc Living Magazine.


EN0511

Amongst all these other wonderful handmade goodies it may not seem to measure up
but for those of you that know this publication you know how beautiful and inspiring it is…… for the others,
you have no idea what you are missing.
This magazine has had a amazing effect on my decorating style and many others.
About half of my home has reflected this style for a long time yet the other half
has been a mish mash of different identities.
It’s been since I learned that my niece from France was coming for a visit this Fall ( hi Vanessa)  that I have
finally decided to tackle some of those projects that have been on my mind for 2 years now
( ok much longer then that)
The guest/sewing room has been a disaster for years now. Disaster is too strong a word.
Well, ok sometimes it was hard to walk around in there without injuring yourself…but
I knew where everything was….and I certainly knew where the pillows were.
EVERYWHERE!
and not all pretty ones either….just ones that I thought I’d recover …..someday.
You know in my spare time while working 7 days a week….ok I digress.
Today I finally finished another piece of furniture.
Whoo hoo!
and I have my friend Z to thank for it.
Yep between her and Martha I made my own chalk paint.
A book from Annie Sloan that hubby bought me yrs ago also convinced me I was on the right track.


anne sloan

At the time I had no idea who Annie Sloan was and that I had one of her books.
Imagine my surprise when the woman’s name that everyone has been talking about was staring right at me.
Well it was exciting for me : ) Doesn’t take much.
Also pays off to clean and organize.
I started with this:

 
1

No Photoshopping done just to give you the real deal.
If I did I would Photoshop a railing for our deck.
I won’t go there.

2
You can see it had some damage to the finish but that was a plus. I did no sanding just a slightly damp cloth to clean.

3

I had taken a photo of it after I painted and sanded but I had it on Manual setting from the day before.
It was overexposed and forgot to look to see if it came out.
I blame it on not having my morning coffee yet.
4

This is after it was waxed with Butchers wax.
Not sure what all the different waxes make.
I had Butchers so that’s what I used.
I’m  a big believer in using what you have.

It just gives it a finished look and along with antiquing it gives it a mellow effect.
5

You can see how the damaged grooves helped the look somewhat.

6


7


edge


leg


more edge

I’m rather happy with how it came out.
This post is getting a bit long…..
are you still there? lol
So I’ll be back with how I accomplished  it and the one I did with talc.

Now don’t forget to enter Suzan’s giveaway

GOOD LUCK

Oh yeah almost forgot,
joining Kathleen at Faded Charm for

Thanks for visiting

Saturday, August 6, 2011

the brush never stops


Lots of painting going on in the last month.
Most of it not blog worthy.
This one I'm experimenting with.
Mixing primer with talc.

It's what I had on hand.
Really wanted to use Whiting.
Any of you ever use whiting?


I remember reading lots of painting technique books back in the 80's that used it.
I have notebooks written from back then with formulas using it.

Somewhere?


This is how it came out.

Later I may do a tutorial on it.

But as my husband likes to say jokingly.

"I'm on break now!"

Yeah ok!


joining


day 6

Tuesday, November 3, 2009

Las Vegas no More!

It's White Wednesday again and WOW did the week fly! Maybe it was having Halloween on Saturday that made it go so fast. I did have some pictures from it but it'll have to wait. I did want to show you my face made up. Very scary....and I know how much you all love scary things...ha-ha! Never did get a picture of me in my whole costume. It's always hard for people to figure out my camera. Slr's I guess intimidate people :)
The last few days I've finally gotten into the rhythm of getting the shop decorated for Christmas. Normally we open on the day after Thanksgiving and every year I say I am going to be open earlier but it never happens. Not sure why I think it will be different this year.

Anyways the other day I decided I was sick of looking at this glitzy iridescent tree that I've had for years. Love that it is very narrow and can hold tons of ornaments for a little tree and is pre-lit but it looked so "Las Vegas" I bought it the year when I was desperate for a silver tree and I think I got it on clearance. Pretty but didn't have the vintage tinsel look that my other trees had. Would be perfect in a modern decor.

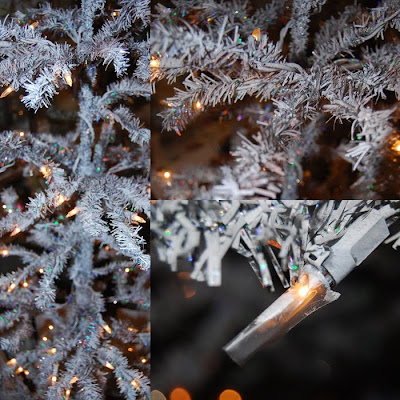
See....very iridescent almost blinding it's so shiny.......turn away if you must!

But then come back and scroll down!!!!!


The easy way to have painted this was to spray paint but I didn't have any white, but I did have cans of paint....boy do I have cans of paint. Being impatient like I am I was dying to see how it would look so I set out to brush the paint on. I know.... what am I crazy?

some would say I am! Of course every light had to be taped off. ....but I was determined to change this tree.

Once I got it completed with the white I pictured it with a more cafe au lait color which I thought I could accomplish with a little rust-oleum spray primer. My friend Paula swears by the stuff and has done miracles with it.... Never works for me and it didn't this time either. The globs of rust color were covered back up with white leaving tinges of brown softly throughout.


It still has some of the silver coming through slightly just giving it "some" sparkle and I think this showgirl has put her diamond studded blinking headpiece away for good.

What stays in Vegas should always stay in Vegas!!!
You know what I mean!
Have a Happy White Wednesday and I hope you all go visit the other gals and [guys] at Kathleens of Faded Charm